How to Use CapCut: A Beginner’s Guide to Editing Your First Video
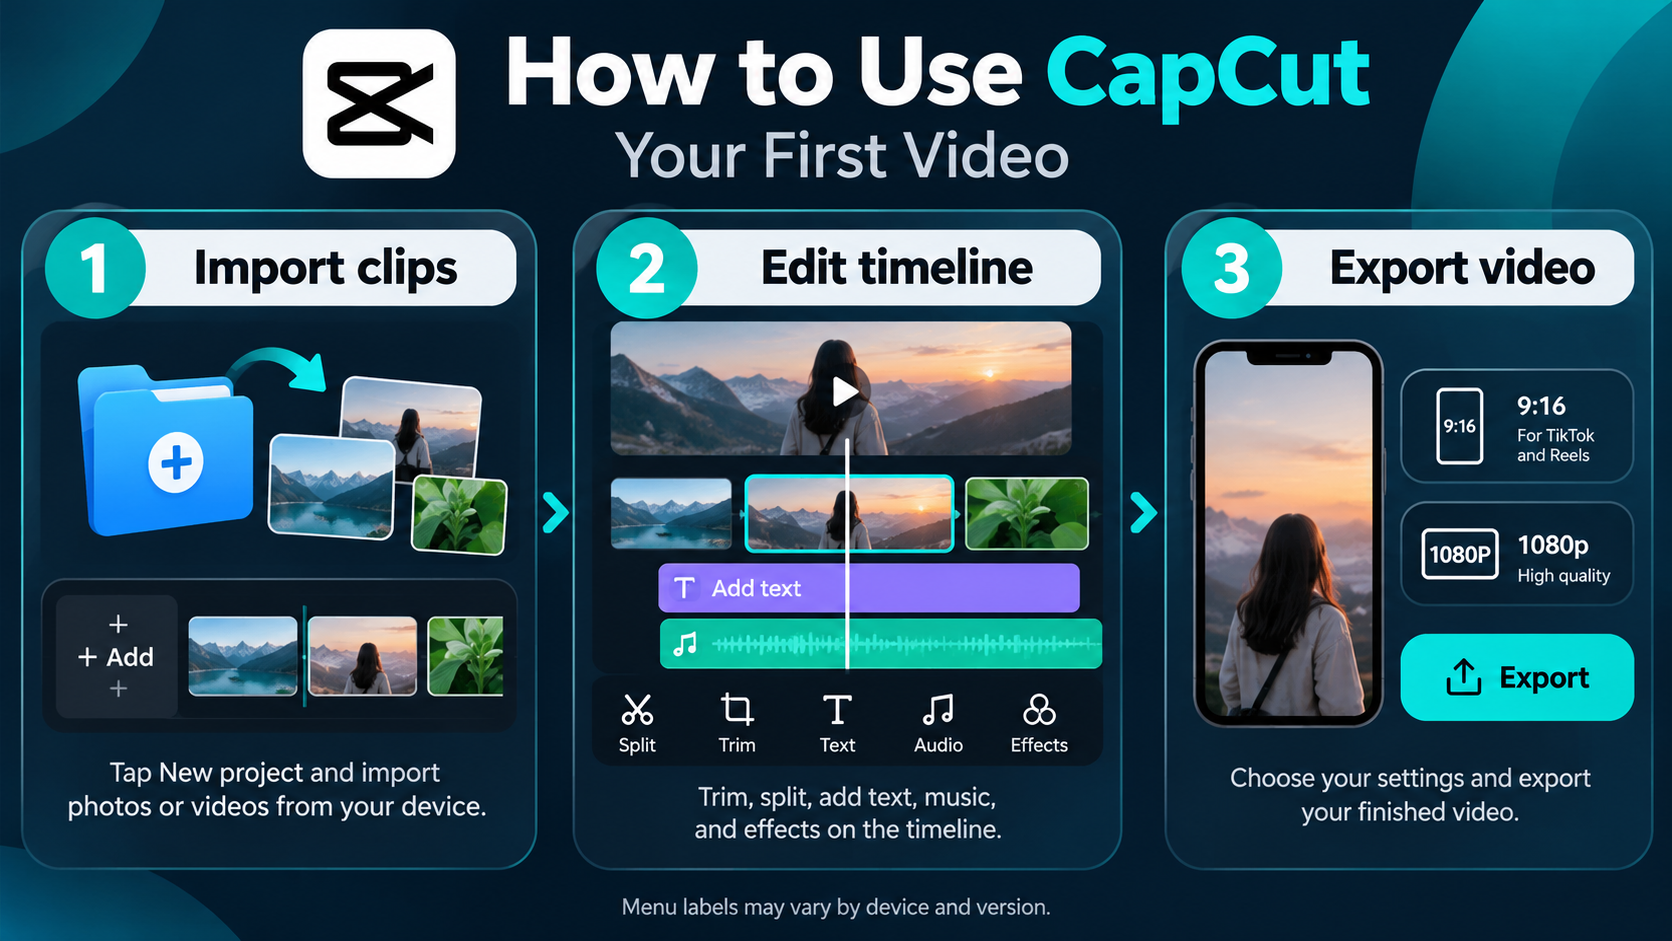
How to use CapCut: start a new project, import your clips, trim unwanted footage, add text and audio, preview the timeline, and export your finished video. You do not need advanced editing experience to make a clean first video.
This beginner tutorial walks you through a real editing workflow on iPhone, Android, PC, Mac, and the web. To practise, choose three short video clips and aim to produce a 20–30-second vertical edit. Button names may change with app updates and platform.
For a broader overview before you start, explore our CapCut features guide.
What Is CapCut and What Can You Make With It?
CapCut is a video editor for phones, computers, and supported web browsers. It combines clips, photos, music, narration, captions, text, effects, and transitions on an editable timeline. People commonly use it for TikTok videos, Instagram Reels, YouTube Shorts, travel highlights, tutorials, and product clips.
The interface looks different on each platform, but the core workflow is the same: add media to a project, arrange it in the desired order, make adjustments, and export a video file. Start with the basic tools rather than exploring every effect at once. Some tools and assets require a subscription or internet connection, and availability varies by account and region.
Before You Start Your First CapCut Project
Gather your source videos, photographs, and audio in one album or folder. Make sure the files are saved locally or accessible to your editing device. For practice, pick three clips with one clear subject and a combined duration under a minute. Keep the originals until you have checked the exported result.
Decide where you will share the video before you start: vertical 9:16 footage suits Shorts, Reels, and TikTok, while horizontal 16:9 usually suits standard YouTube videos. If you are filming specifically for a vertical video, leave enough space around your subject so cropping does not remove important details.
Install CapCut only from a verified official source. If access varies in your region, see our guide to downloading CapCut in India safely, which explains availability checks and risks of unofficial installers.
How to Use CapCut on iPhone and Android
Step 1: Create a project and import footage
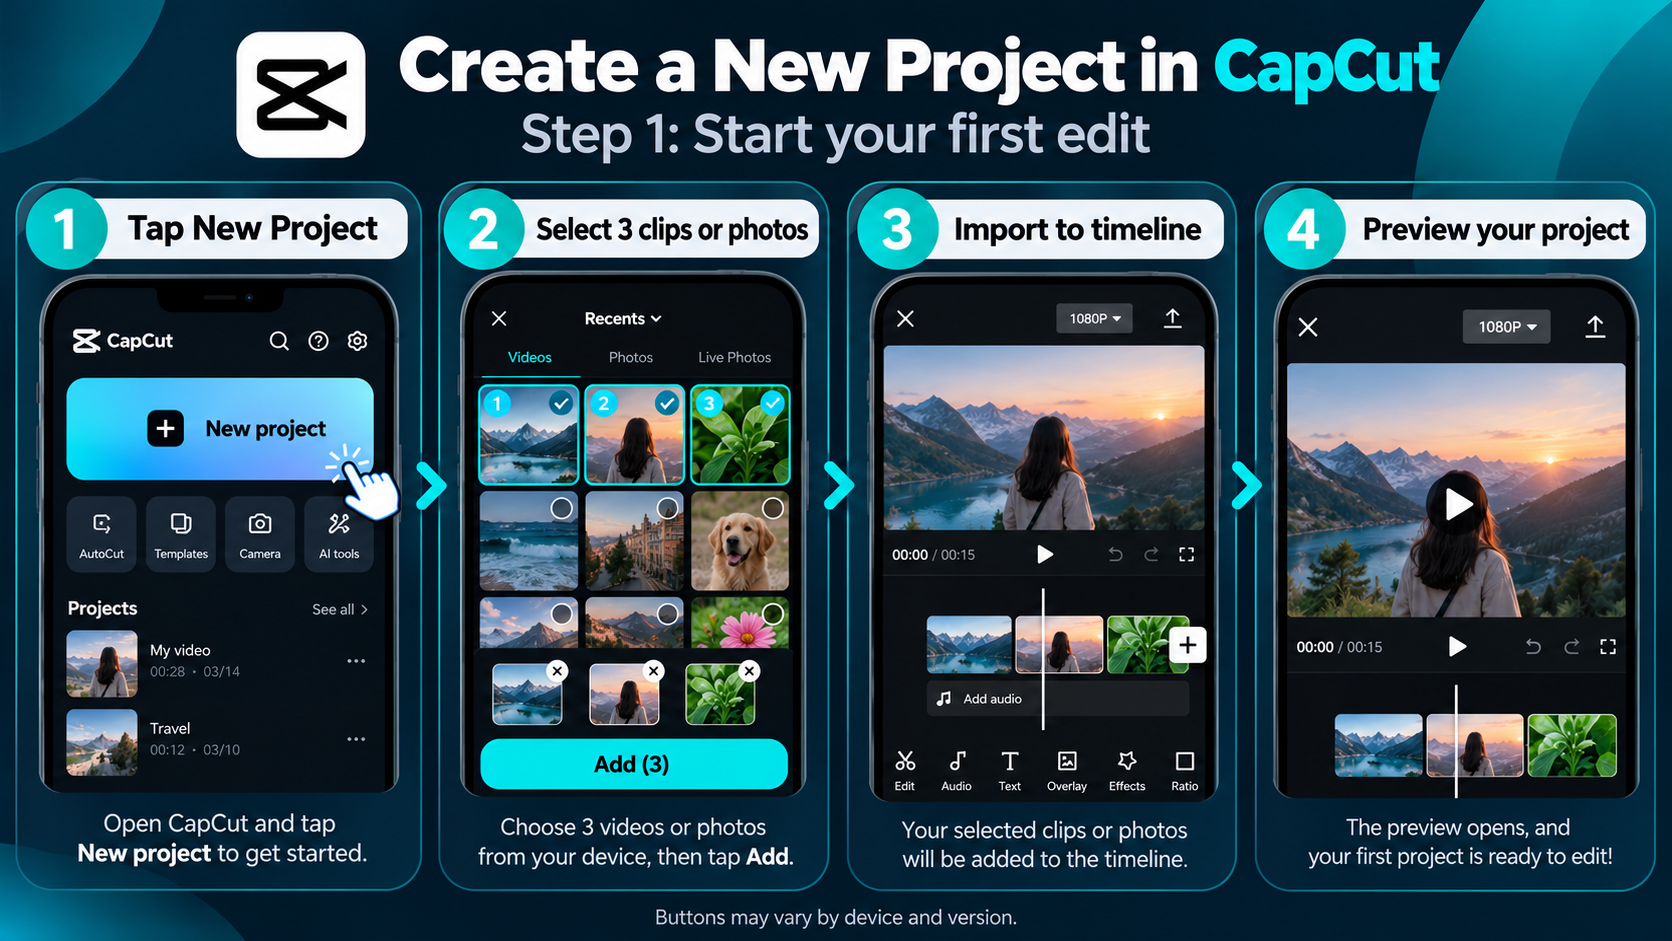
- Open the CapCut app and select New project.
- Allow access to the photos or videos you actually want to import.
- Select your practice clips and tap the add or import control.
- Check the preview and timeline to confirm all chosen clips are present.
The preview displays the frame under the playhead, while the timeline represents the order and length of your footage. Drag across the timeline to move to a different moment. If you accidentally import the wrong clip, select it and remove it before moving on.
Step 2: Trim, split, and reorder clips
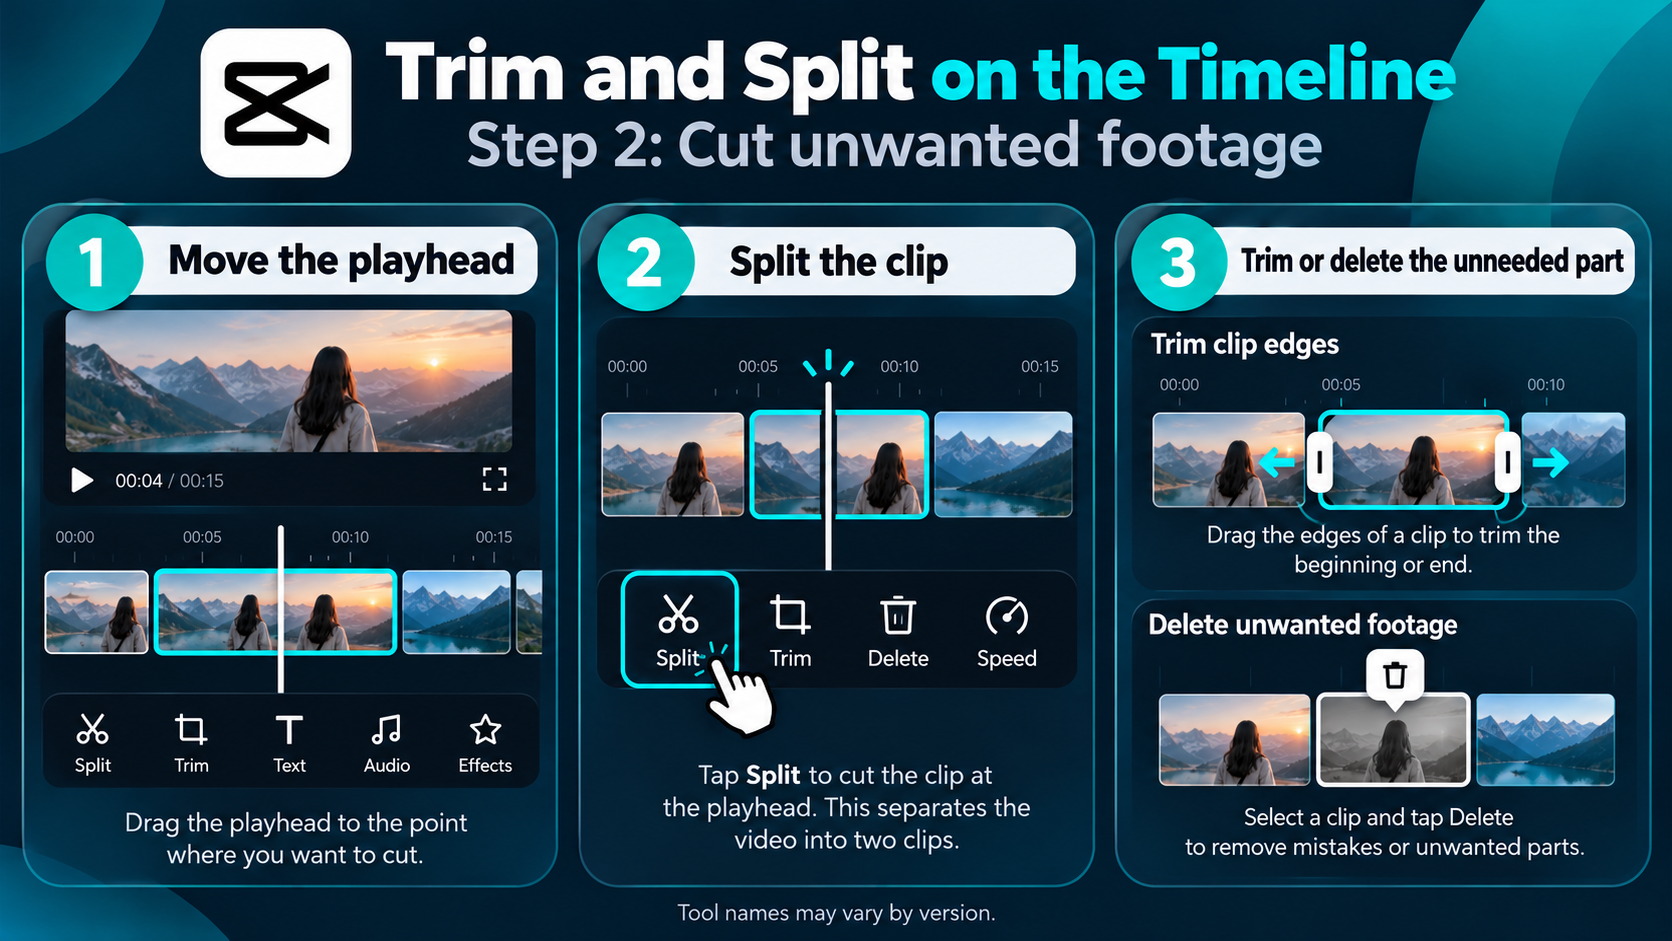
Tap a clip on the timeline to reveal editing controls. To trim, drag its beginning or ending handle inward to shorten the clip. To split, position the playhead where a cut should happen and choose Split. Select the unwanted segment and delete it. Rearrange segments by dragging them into the order you want.
For a 30-second practice edit, try a two-second opening shot, three or four concise middle shots, and a clear closing scene. Watch the transitions between clips before adding effects. A simple cut is often more effective than a decorative transition.
Step 3: Set the aspect ratio
Use the format or aspect-ratio control to choose 9:16 for a vertical video or 16:9 for a landscape project. Reposition or scale each shot if your source video does not fit the new canvas. Review the frame carefully: cropping to fill the screen may remove heads, product labels, or subtitles near the edges.
For more control over titles and typography, follow our step-by-step guide to adding text in CapCut.
Step 4: Add text and captions
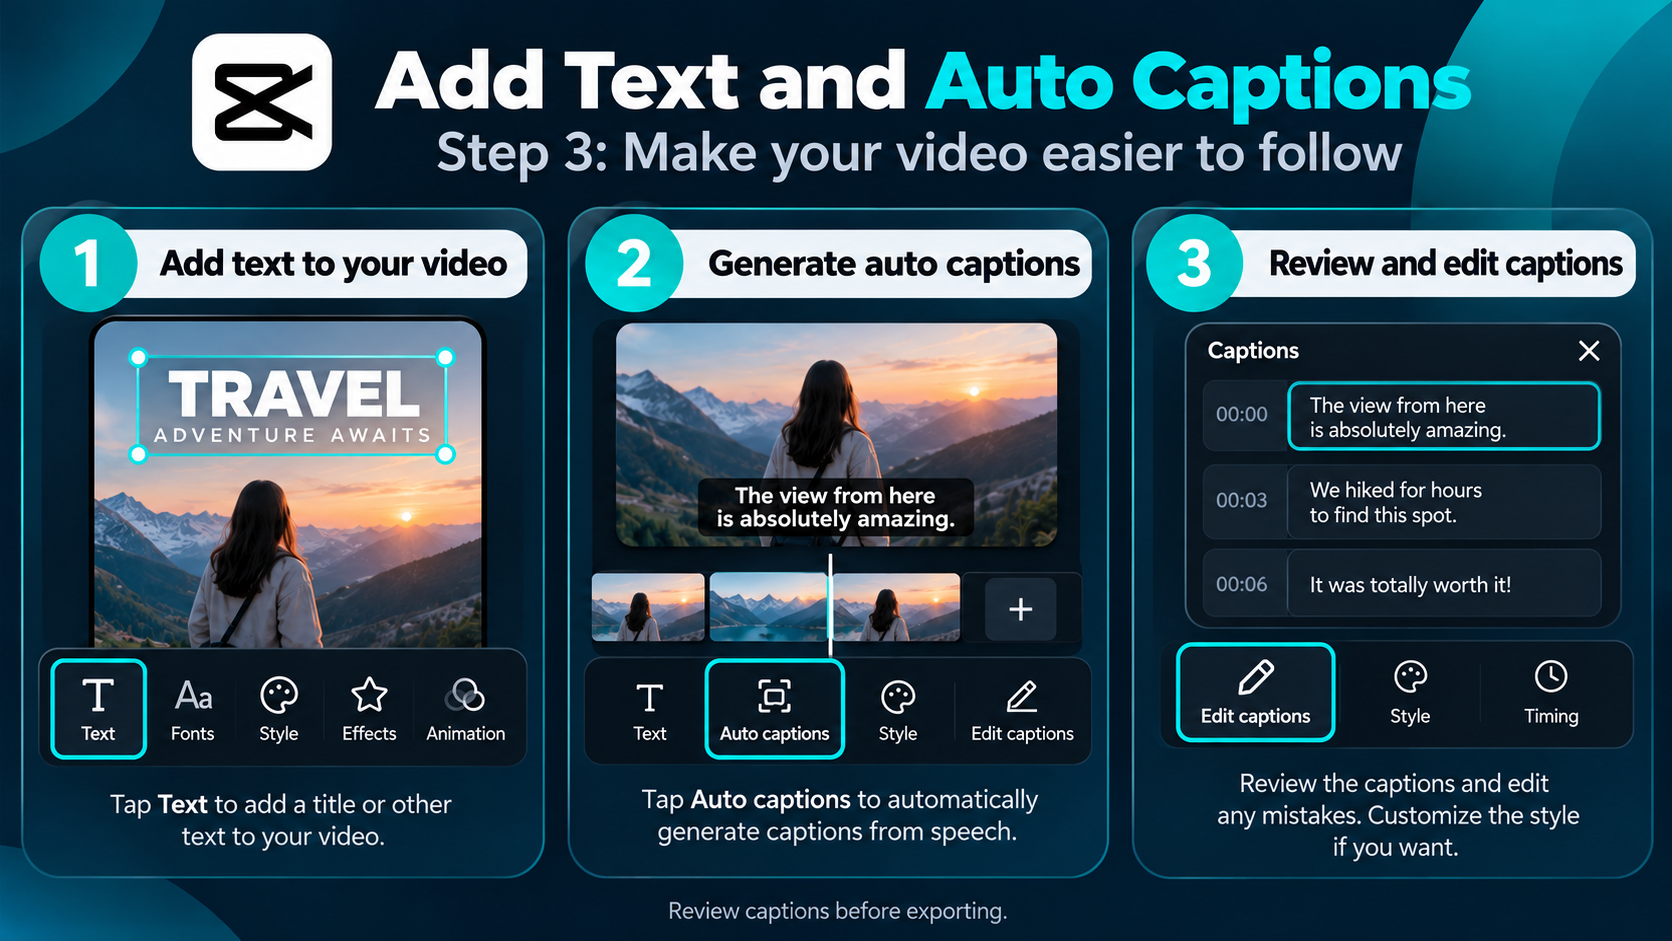
Open Text, select the text option, and type a short opening title. Adjust its placement and duration on the timeline so it remains visible long enough to read. Avoid placing important words right against the top or bottom edges, where social-platform interface elements can overlap them.
If your video includes speech, look for Auto captions or an equivalent subtitle option. Select the spoken language, generate captions where available, and proofread every line. Automatic captions can mishear names and colloquial expressions. For a fuller walkthrough, follow our CapCut auto-captions tutorial.
Need help with sound and layered effects? See how to add music in CapCut and our CapCut overlays guide.
Step 5: Add music, narration, and effects
Open the audio tools and add a recording, voice-over, or music track that you have the right to use. Listen with headphones and lower the music when someone is speaking. Check the first and last frames for abrupt audio starts or cuts. An end fade can make a short edit feel more finished.
Try one simple filter or transition if it supports the story. Do not pile effects onto every clip: excessive motion and flashing can distract viewers. If you want a more energetic example later, our speed-ramp CapCut template guide covers one popular editing style.
Step 6: Preview and export your video
Play the video from beginning to end. Look for accidental black frames, awkward cuts, misspelled captions, loud music, and important subjects cropped out of view. Then use the export control, select suitable resolution and frame rate, and save the file.
1080p is a practical first choice for most short-form uploads when your source footage supports it. Keeping the frame rate consistent with the source helps avoid unexpected motion changes. Play the exported file outside the editor before posting; this verifies that both the video and audio were actually saved.
How to Use CapCut on PC or Mac
CapCut’s desktop editor gives you a larger preview, a multi-track timeline, and precise mouse controls. Download the desktop version from the official CapCut website if it is available for your device. Open the app and choose Create project or New project.
- Choose Import to select media, or drag compatible files from your computer into the media panel.
- Drag your first clip onto the timeline, then add additional clips after it.
- Move the playhead to a desired cut and select Split. Delete unwanted sections and close gaps.
- Use Text to add titles, Audio to add sound, and the available panel controls to adjust appearance and timing.
- Preview the sequence, then open Export, select the destination and appropriate output settings, and save.
Unlike mobile editing, you may see several tracks stacked vertically. Video on upper tracks can overlay lower tracks; audio can occupy separate tracks. Make sure a title or music clip does not extend past the intended end of the video. The exact toolbar positions and feature names can vary by version.
How to Use CapCut in a Web Browser
On a supported browser and region, open the official CapCut website and launch the online editor. Create a new video, upload your clips, and place them on the browser timeline. You can trim, split, rearrange, and add text or other available elements before exporting.
Web editing can be convenient on a shared computer because you may not need a local application install. However, uploading client footage may involve cloud processing and storage. Read your project’s privacy requirements before using online features, and allow time for large files to upload. If a cloud feature fails, check connectivity and whether it is offered to your account.
Best Export Settings for TikTok, Reels, and YouTube
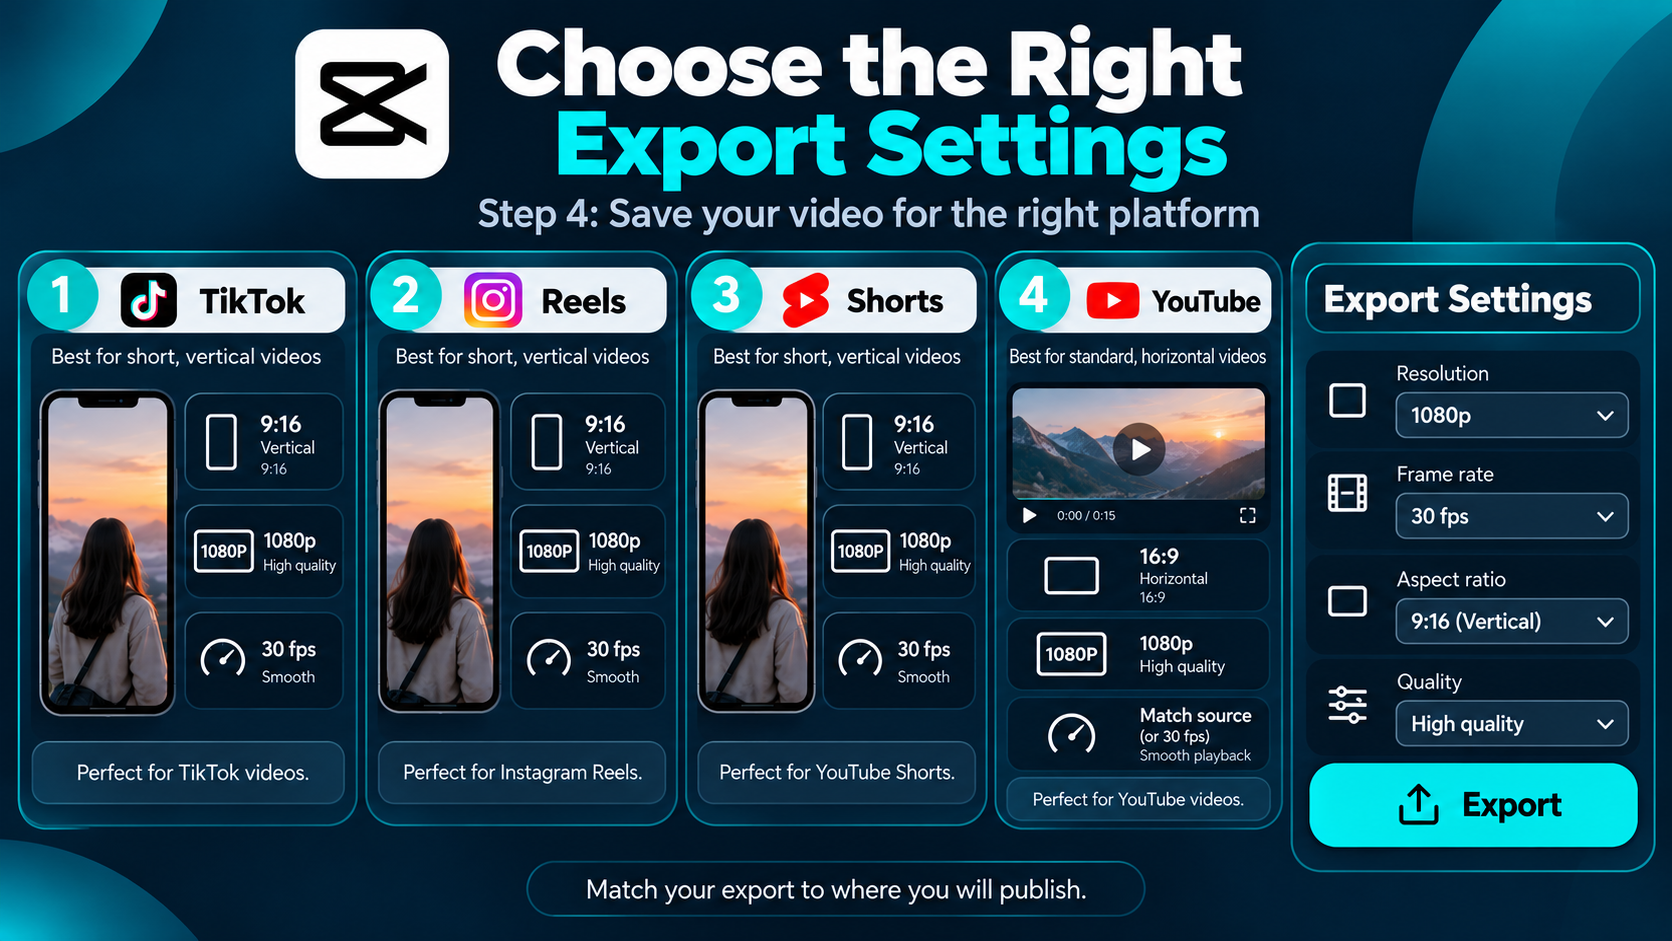
| Destination | Canvas | Starting export choice |
|---|---|---|
| TikTok | 9:16 vertical | 1080p; match source frame rate |
| Instagram Reels | 9:16 vertical | 1080p; review text-safe areas |
| YouTube Shorts | 9:16 vertical | 1080p; preview exported audio |
| Standard YouTube | 16:9 horizontal | 1080p or appropriate source resolution |
These are sensible starting points rather than platform upload guarantees. Higher settings do not recover detail from blurry source footage. If an export is very large, lower the bitrate or resolution appropriately instead of assuming the highest selectable quality is always best.
Common Beginner Mistakes and How to Fix Them
The exported video looks blurry
Check the resolution of the original clips, the project’s canvas, and the export setting. Low-quality footage will not become sharp merely by exporting at 4K. Avoid enlarging a small source clip excessively.
Captions do not match the narration
Play each caption against the audio and adjust its text or timing manually. Regenerate captions only when necessary; proper proofreading is still required.
Music is louder than the voice
Select the music clip and reduce its volume, especially under speech. Check with headphones as well as the phone speaker. A gentle fade can avoid abrupt endings.
CapCut feels slow or freezes
Close heavy applications, free storage space, reduce unnecessary effects, and restart the editor. Duplicate or back up important project files before making troubleshooting changes. Complex effects and high-resolution clips require more processing resources.
If templates are unavailable, use our CapCut templates not showing troubleshooting guide rather than reinstalling immediately.
Templates or online effects are missing
Some features vary by account, app version, subscription, and location. Verify the official app version and connection. Do not download an unverified modified installer just to unlock unavailable effects.
Frequently Asked Questions
Is CapCut free for beginners?
CapCut offers editing capabilities without requiring every user to purchase a subscription, but certain premium features and assets may require a paid plan. Check the label on an effect before relying on it in your project.
Can I use CapCut without editing experience?
Yes. Start by importing footage, trimming a few clips, adding one title, and exporting. Mastering this sequence matters more than knowing every advanced feature.
How do I cut out the middle of a clip?
Split at the beginning and end of the unwanted portion, select the middle segment, then delete it. Review the remaining clips for gaps.
Can I edit a YouTube video on my phone?
Yes, subject to your device’s performance and the formats supported by your CapCut version. Choose a horizontal canvas for a conventional YouTube video or vertical for a Short.
Does CapCut automatically save projects?
Many CapCut versions save project edits automatically, but storage and sync behavior differ across devices. Keep a backup of original media and export the finished video before deleting an app or project.
How do I cancel CapCut Pro if I only want free tools?
Cancel through the billing provider that processed your payment: Apple Subscriptions, Google Play Subscriptions, or CapCut’s own account billing options, as applicable. Deleting the editing app alone does not cancel recurring payments.
Before publishing your edit, review our guide to removing CapCut watermarks if an unwanted end card or watermark appears.
Final Checklist for Your First CapCut Video
- Imported the correct clips and set the desired aspect ratio.
- Removed unnecessary footage and checked the order of scenes.
- Made titles readable and corrected automatic captions.
- Balanced sound and previewed the full edit.
- Exported an appropriate file and verified the saved result.
For the first few projects, focus on clear pacing, readable text, and reliable exports. Once those fundamentals feel comfortable, build your editing skills with transitions, speed changes, overlays, and more advanced effects.